Setting Up a Raspberry Pi VPC Network has captured the attention of tech enthusiasts who wish to create scalable, secure, and efficient virtual private cloud (VPC) networks using Raspberry Pi devices. Regardless of whether you're a novice or an experienced developer, learning how to establish a VPC network with Raspberry Pi can significantly enhance your networking abilities. This article will explore the intricacies of building a VPC network using Raspberry Pi, offering practical examples and actionable steps.
As the Internet of Things (IoT) continues to expand, the demand for robust and cost-effective networking solutions grows. Raspberry Pi, known for its affordability and versatility, provides an excellent platform for experimenting with VPC networks. By following this guide, you'll learn how to configure and manage a VPC network that can serve various purposes, such as hosting servers, creating private subnets, and securing data communication.
This article aims to provide a step-by-step approach to constructing a Raspberry Pi VPC network. We will cover essential concepts, tools, and configurations to ensure your network is both functional and secure. Let's get started!
Read also:Nikki Catsouras Photos Body A Comprehensive Examination Of The Controversy Facts And Impact
Table of Contents
- Introduction to Raspberry Pi VPC Networks
- Overview of Raspberry Pi
- Understanding the Basics of VPC
- Necessary Tools and Software
- The Setup Process for Raspberry Pi VPC
- Configuring the Network
- Implementing Security Measures
- Troubleshooting Common Issues
- Example Scenarios for Raspberry Pi VPC
- Conclusion and Next Steps
Introduction to Raspberry Pi VPC Networks
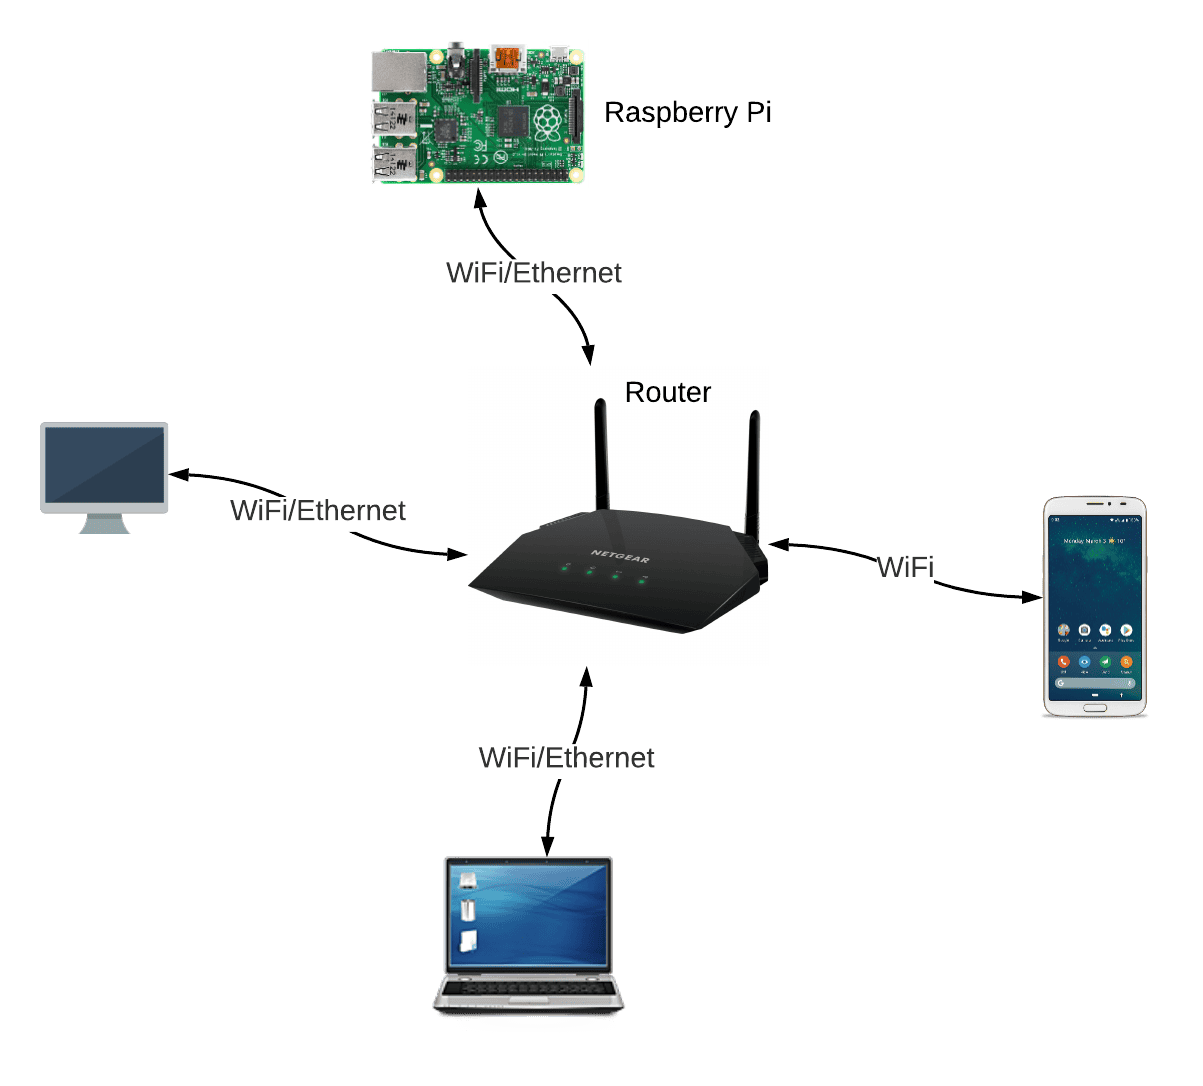
A Raspberry Pi VPC network refers to the creation of a virtual private cloud environment using Raspberry Pi devices. This setup allows users to isolate network traffic, enhance security, and manage resources more effectively. VPC networks are typically used in cloud computing environments, but with Raspberry Pi, you can create a similar setup locally or in a hybrid environment.
Raspberry Pi's affordability and flexibility make it an excellent choice for developers, hobbyists, and small businesses interested in experimenting with VPC networks. By leveraging open-source tools and software, you can build a functional VPC network that supports various applications, from hosting web servers to managing IoT devices.
Overview of Raspberry Pi
Raspberry Pi is a series of compact single-board computers developed by the Raspberry Pi Foundation. These devices are renowned for their low cost, energy efficiency, and versatility. Over the years, Raspberry Pi has gained popularity among tech enthusiasts, educators, and professionals due to its ability to support a wide range of applications, including:
- Home automation systems
- Media centers
- Web servers
- IoT projects
This guide will focus on using Raspberry Pi as a platform for building a VPC network. The latest models, such as Raspberry Pi 4 and Raspberry Pi 5, offer enhanced performance and connectivity options, making them ideal for network-related tasks.
Understanding the Basics of VPC
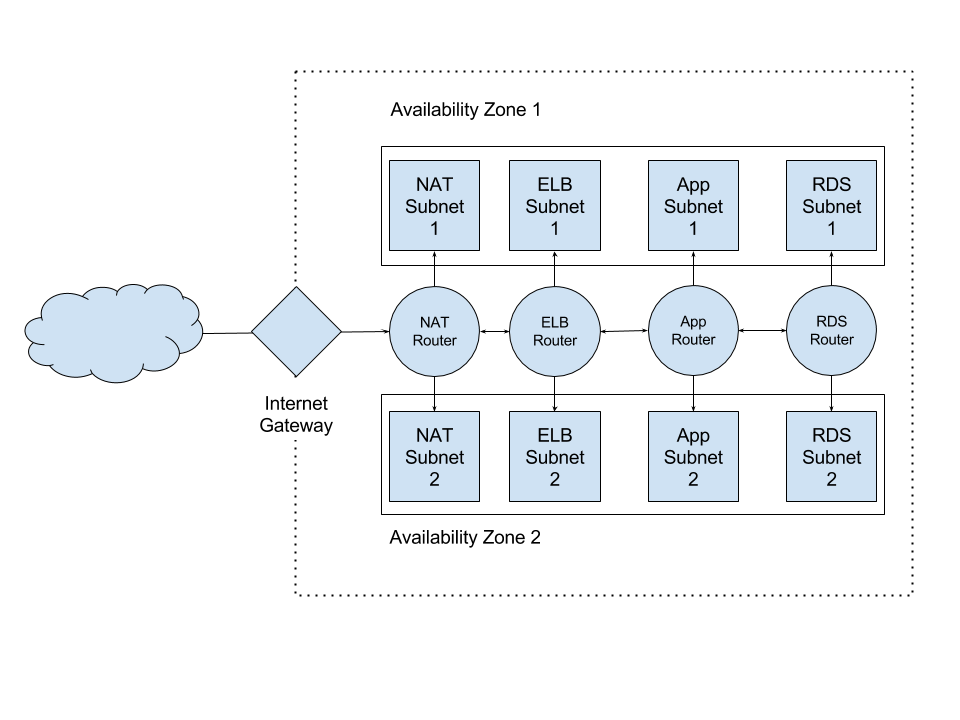
A Virtual Private Cloud (VPC) is a virtual network environment that provides isolated and secure connectivity for cloud resources. In a VPC network, you can define subnets, route tables, security groups, and access control lists to manage traffic and resources effectively. Key features of VPC networks include:
- Private subnets for isolating sensitive data
- Public subnets for hosting publicly accessible services
- Network address translation (NAT) for enabling communication between private and public networks
By implementing a VPC network on Raspberry Pi, you can achieve similar functionality locally, allowing you to test and experiment with network configurations before deploying them in a larger environment.
Read also:Granblue Fantasy Relink Cross Platform
Necessary Tools and Software
Setting up a Raspberry Pi VPC network requires several tools and software components. Below is a list of essential items:
- Raspberry Pi device (Model 4 or 5 recommended)
- MicroSD card with Raspberry Pi OS installed
- Ethernet cables or Wi-Fi adapter for connectivity
- Power supply for Raspberry Pi
- SSH client for remote access (e.g., PuTTY or Terminal)
- Networking tools such as iptables and dnsmasq
Ensure you download the latest version of Raspberry Pi OS from the official website and install it on your microSD card using a tool like Balena Etcher. This will guarantee you have a stable and secure operating system for your VPC network setup.
The Setup Process for Raspberry Pi VPC
The setup process for a Raspberry Pi VPC network involves several steps, including hardware configuration, software installation, and network setup. Below is a detailed guide to help you get started:
Step 1: Hardware Configuration
Begin by assembling your Raspberry Pi device and connecting it to your network. Ensure all necessary components, such as power supply, Ethernet cables, and microSD card, are properly connected. You can also configure Wi-Fi settings if you prefer a wireless connection.
Step 2: Initial Setup
Once your Raspberry Pi is powered on, complete the initial setup by configuring basic settings such as hostname, timezone, and user accounts. You can achieve this through the Raspberry Pi Configuration tool or the terminal.
Step 3: Install Networking Tools
Install essential networking tools like iptables and dnsmasq to manage traffic and DNS resolution. Use the following commands to install these tools:
sudo apt update
sudo apt install iptables dnsmasq
Configuring the Network
Configuring your network is a critical step in setting up a Raspberry Pi VPC network. Below are some key considerations:
Subnet Configuration
Create separate subnets for private and public traffic. For instance, you can use the following IP ranges:
- Private subnet: 192.168.1.0/24
- Public subnet: 192.168.2.0/24
Configure your Raspberry Pi's network interfaces to use these subnets by editing the /etc/network/interfaces file.
Routing and NAT
Set up routing rules and NAT to enable communication between subnets. Use iptables to define firewall rules and forward traffic between private and public networks. For example:
sudo iptables -t nat -A POSTROUTING -o eth0 -j MASQUERADE
Implementing Security Measures
Security is a vital aspect of any VPC network. Below are some best practices to enhance the security of your Raspberry Pi VPC setup:
- Use strong passwords and enable two-factor authentication
- Regularly update your Raspberry Pi OS and installed software
- Configure firewalls to restrict unauthorized access
- Monitor network traffic for suspicious activity
By implementing these measures, you can safeguard your VPC network from potential threats and ensure its smooth operation.
Troubleshooting Common Issues
Even with meticulous planning, you may encounter issues while setting up your Raspberry Pi VPC network. Below are some common problems and their solutions:
- No network connectivity: Verify your Ethernet or Wi-Fi settings and ensure the correct IP address is assigned to your Raspberry Pi.
- Firewall blocking traffic: Review your iptables rules and allow necessary ports for communication.
- DNS resolution issues: Ensure that dnsmasq is properly configured and running.
Example Scenarios for Raspberry Pi VPC
Here are a few example scenarios where a Raspberry Pi VPC network can be advantageous:
Scenario 1: Home Lab Environment
Establish a VPC network for your home lab to isolate test environments from your main network. This setup allows you to experiment with new technologies without disrupting your daily operations.
Scenario 2: IoT Device Management
Utilize Raspberry Pi as a gateway for managing IoT devices in a secure VPC network. This ensures that sensitive data is protected, and communication remains reliable.
Conclusion and Next Steps
In this article, we have explored the concept of Raspberry Pi VPC network and provided a comprehensive guide to setting it up. By following the outlined steps, you can create a functional and secure VPC network using Raspberry Pi devices. Remember to implement security measures and regularly update your setup to ensure optimal performance.
We encourage you to share your experiences and ask questions in the comments section below. Additionally, feel free to explore other articles on our site for more insights into Raspberry Pi and networking topics. Happy building!
References: